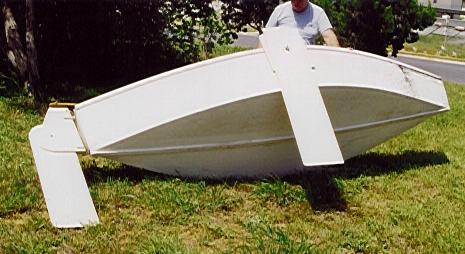
 D.H. (not the author of this page) is shown holding the boat that he designed.
This photo shows the leeboard and the whole rudder assembly attached to the hull, and in the full down positions that
they would have when sailing.
D.H. (not the author of this page) is shown holding the boat that he designed.
This photo shows the leeboard and the whole rudder assembly attached to the hull, and in the full down positions that
they would have when sailing.
The DH Boat is a plywood construction.
It was a design project by a friend of mine, to see how big a boat he could build out of 2 sheets of 4 ft. x 8 ft. plywood.
Note that the boat in these pictures is over 10 years old, and has been in storage for about 5 years.
General pictures of the hull.
D.H. (not the author of this page) is shown holding the boat that he designed.
This photo shows the leeboard and the whole rudder assembly attached to the hull, and in the full down positions that
they would have when sailing.
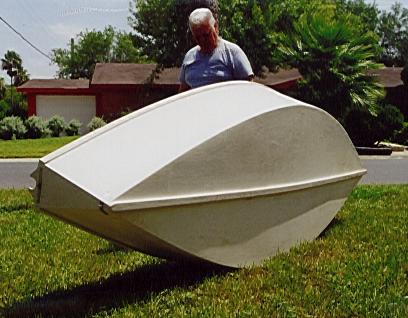 He mentioned to me that it might
be better to widen the transom, (back end) and that one might still may
be able to get it built within the 2 sheets of plywood design limit. Of
course if you want to buy a 3rd sheet of plywood it should not be a
problem at all.
He mentioned to me that it might
be better to widen the transom, (back end) and that one might still may
be able to get it built within the 2 sheets of plywood design limit. Of
course if you want to buy a 3rd sheet of plywood it should not be a
problem at all.
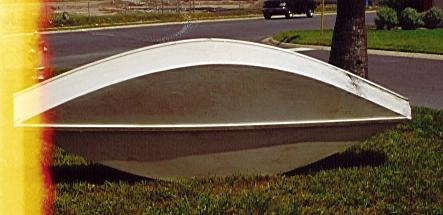 Sorry about the light-struck end of this picture.
It is the best one I have that shows the whole bottom, and gives a good idea of the shape of the hull.
It also shows the outer keel. This is a 1 inch thick piece cut from a 2x4.
(A 2x4 is a piece of framing lumber used in USA. A long time ago it was 2 inches thick and 4 inches wide and as long as needed.
Now they are planed down and are effectively 1 and 5/8 inches by 3 and 5/8 inches and as long as needed.)
Sorry about the light-struck end of this picture.
It is the best one I have that shows the whole bottom, and gives a good idea of the shape of the hull.
It also shows the outer keel. This is a 1 inch thick piece cut from a 2x4.
(A 2x4 is a piece of framing lumber used in USA. A long time ago it was 2 inches thick and 4 inches wide and as long as needed.
Now they are planed down and are effectively 1 and 5/8 inches by 3 and 5/8 inches and as long as needed.)
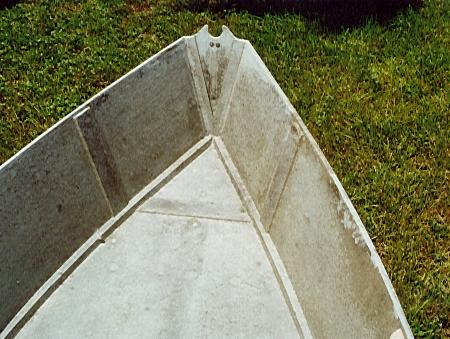 The inside of the stern, showing the transom and the framing around the transom that
is necesary to screw on the sides. The transom is made of a scrap of half inch (.5 inch or about 12 mm ) plywood.
The inside of the stern, showing the transom and the framing around the transom that
is necesary to screw on the sides. The transom is made of a scrap of half inch (.5 inch or about 12 mm ) plywood.
You can also see the butt blocks on the sides and bottom where the plywood is joined together.
Since they are so close together it may seem that the construction would not be as strong as if
they were more staggered from one another. Actually since they overlap so much, and are the same
thickness as the original plywood there is probably a gain in strength.
The butt blocks used to reinforce the joining of 2 plywood pieces
are made of the same 1/4 inch ( about 7 mm ) plywood as the rest of the
hull, and are 3 inches wide and as long as needed. Their ends are cut
or sanded to an angle so as to not leave a rough edge on the inside of
the boat. They are attached by 1/2 inch screws and generous amounts of
waterproof glue - Epoxy is used on the prototype boat. The prototype
boat used small brass nails to attach the butt blocks that were about
5/8 inch long and a smooth piece of metal was placed under the pieces
being joined. The nails were set at a slight angle and went through
both pieces of plywood and then curled back at the point back into the
bottom piece of wood, making a very strong and permanent connection. I
think the nails used were brass cobbler's nails, and I suspect that
they would be very hard to get. Small brass screws would probably work
just fine. Remember that you will probably have to file or sand the
points off when they come through just a little on the outside.
The shape at the top of the transom is to allow an oar to be used as an emergency rudder, or for an oar to be used to scull
(propel the boat with one oar over the stern) the boat. If one really wants to scull the boat it would be best to
attach a couple of feet of skeg (long thin and shallow fin keel) to the back of the external keel to help it track well.
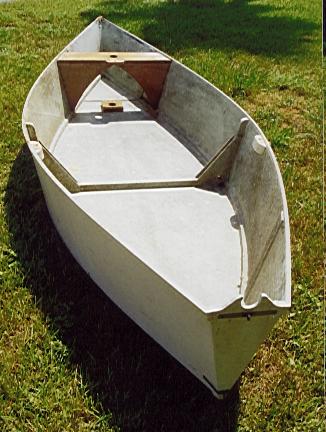 View of the whole hull, stern to stem. (back to front)
 View of the whole hull, stem to stern. (front to back)
Click here to the whole hull pictures - this page - (DHBoatP1.htm).
Click here to the Hull Detail pictures (DHBoatP2.htm).
Click here to the Detail pictures - Leeboard - (DHBoatP3.htm).
Click here to the Detail pictures - Rudder - (DHBoatP4.htm).
Click here to the Detail pictures - Oars - (DHBoatP5.htm).
Click here to the page with the Diagrams (DHBoat1.htm).
If you mail me about this page refer to page DHBoatP1.htm