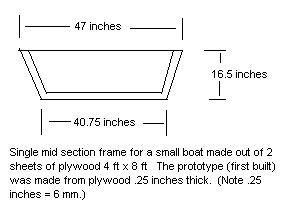
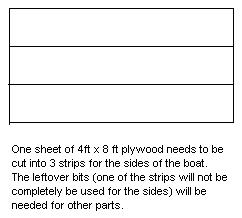
These are some of the building details for building the maximum boat out of 2 sheets of 4 foot x 8 foot plywood.
The frame in the middle is the key to the whole shape of the boat.

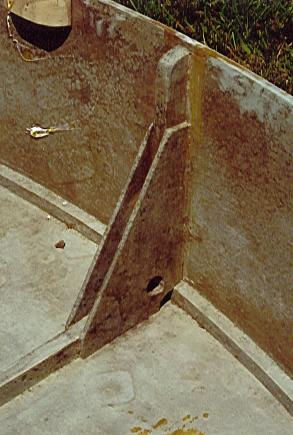 This is a photo detail of the corner of the frame.
The hole serves a purpose. It gives a place to pass a rope through to tie something to the boat inside.
It also allows for a place for water to escape from being caught in the corner and promote rot.
This is a photo detail of the corner of the frame.
The hole serves a purpose. It gives a place to pass a rope through to tie something to the boat inside.
It also allows for a place for water to escape from being caught in the corner and promote rot.
IMPORTANT This picture, and all the pictues show that the chine log is inside the boat.
It will be MUCH easier to built this boat with the chine log OUTSIDE the hull.
I have been thinking about this detail for several days since I was asked to help someone build
a boat. There is a major boat designer who uses the outside chine method.
There is no shame in doing something different from the normal course. The boat will be
just as strong. It will look different from most, but it should function as well.
When building this boat, use common sense. Sketch out a detail before cutting wood. Think about it. This experience is ment to be a learning process. You will have to use arithmetic skills and a certain amount of simple applied geometry.
Screws - you will need some Flat Head Brass Screws - or could use Stainless Steel.
If you use plated steel screws they will eventually rust and get ugly, but if the
boat is only to last 2 or 3 years steel will work.
perhaps 50 # 8 screws 1.25 or 1.5 inches long
perhaps 20 # 10 screws 1.5 inches long
perhaps 150 # 8 screws .75 inches long
perhaps 100 # 8 screws 1 inch long
about 100 # 6 screws .5 inches long - for the butt joints in the plywood sides.
(or you could try to find the 5/8 inch small brass nails mentioned.)
All the above are approximations depending on how close you apply the screws.
You will need to use some judgement. Generally 3 inches apart is close, 6 or more inches
apart is a long distance apart. The keel may be attached at 8 inch intervals.
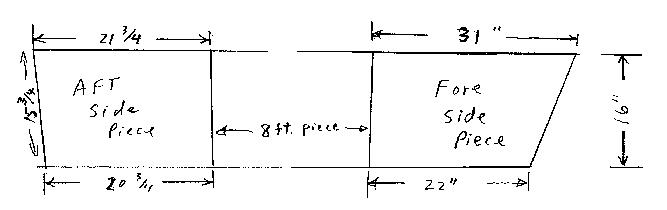
1. Make up the long strips of plywood that will be the sides of the boat.
2. Make the middle frame.
Make the sides part of the frame 4 or more inches too long.
That way the boat will have something to stand on when it is in the building stages.
These will be cut to length just before you put the gunwales on.
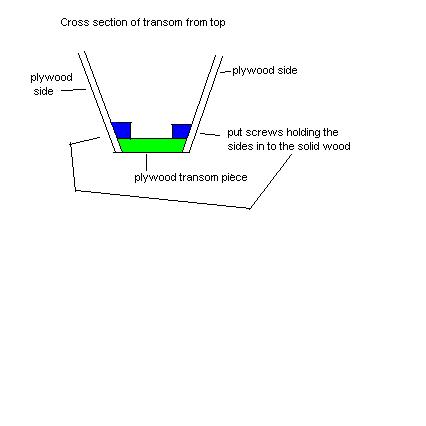
3. Make the transom. Cut it out to general shape and mount the strips of wood used to
attach the sides. Do not yet shape them to the angle needed to actually attach the
transom to the sides. At this stage you do not know the angle.
4. Temporarily wrap the sides around the frame.
Have someone hold the front together, and someone hold the back together against the
transom.
5. Take a piece of cardboard and hold it on top of the front of the boat while it is
being held together. With a pencil mark the inside to get an accurate
measurement of the angle at which the front sides are coming together.
6. Take another piece of cardboard and hold it over the back of the boat and
measure the angle there, tracing it onto the cardboard.
7. Carefully relax the sides of the boat and set all the pieces down.
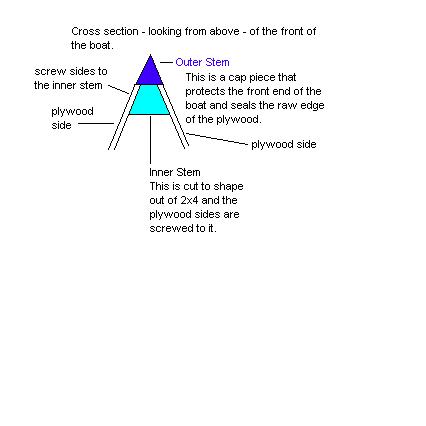
8. Make the inner stem piece from a piece of 2x4. Cut the front of it like a
triangle in section so that when you next bend the sides around the middle frame
that it will fit neatly inside just between the plywood sides.
Make the inner stem longer than what is needed by the same amount as you made the
sides of the frame. This will be cut to length just before you put the gunwales on.
9. Shape the sides of the transom to the proper angle so they will fit the plywood
sides so that when you next bend the sides around the middle frame
that it will fit neatly inside between the plywood sides.
10. Screw and glue the frame to the middle of the sides. It should form an H pattern.
Use #8 screws 1 inch long.
11. Bend the ends of the sides together.
Do both ends at the same time keeping the pressure even so that the boat sides stay even.
A loop of rope is often used to help hold the sides together when doing this bending.
In the front glue and screw the sides to the inner stem.
In the back glue and screw the transom to the sides.
Use #8 or even perhaps #10 screws 1 and a quarter inch long, maybe even 1.5 inches long.
12. Wipe off extra glue and wait for it to harden. Perhaps overnight.
13. Attach the external chine logs to the outside of the bottom edge of the sides with
glue and screws. Run all the screws from the inside through the plywood out into the
chine logs whenever there is room. Use your judgement as to the spacing of the screws.
I expect that every 3 to 6 inches will be good. If you have lots of C clamps use them
between the screws. You may want to use waxed paper or plastic wrap to keep the clamps
from sticking to the work. For the front and the back you will have to screw from the outside.
Use # 8 3/4 inch screws.
14. Wipe off extra glue and wait for it to harden. Perhaps overnight.
When the glue is hard remove the clamps.
(During these hull glue hardening times one can work on the leeboard, rudder, oars, mast, sail etc.)
15. Using a plane, or belt sander or other device work down the chine log, transom and inner stem
to flatten the bottom to get ready to put on the bottom. Make it flat enough that when the
bottom lies on the sides it rests solidly on them and there is no gap. There should be some rocker
(curve from front to back) in the bottom. It should be flat from side to side.
16. Lay a piece of plywood on the bottom in the middle. Mark it for cutting and using a jigsaw
cut it out. Then with it laying in place measure the pieces needed to finish the bottom on
both ends. Make up butt block pieces and attach them to get the whole bottom in a single piece.
(You may glue and screw the middle bottom down first and add the front and back bottom pieces
after the middle is glued and screwed in place.) Use #8 screws 1 inch long.
17. Wipe off extra glue and wait for it to harden. Perhaps overnight.
18. Sand and smooth all rough edges.
20. Attach the outer keel to the middle of the bottom. The outer keel is a 1 inch thick
slice off a 2x4. It is in cross section about 42 mm x 26 mm more or less, and as long
as the bottom of the boat. Glue on keel and put screws in the front and back to hold it in
place. Then turn the boat right side up from the inside, run additional screws through
the plywood into the keel. Use #8 screws 1 inch long.
After this turn the boat back over, as the next step is best done with it upside down.
19. Grind (belt sanders work well for this) the front flat to something looking like
This is to accept the outer stem, which will be screwed and glued on later.
21. Make the outer stem and attach (glue and screw) the outer stem on the front of the boat. Use # 10 screws, aboout2 inches long.
22. Tip the boat right side up.
23. Make the Gunwales and attach them to the upper edges of the sides.
24. The prototype did not have a front deck. DH thinks that it would be a much
better boat with a front deck. Put in a deck frame. It should be slightly rounded.
Then run a ridge board from the inner stem to the center of the deck frame.
25. Measure a piece of plywood for the deck, (run grain front to back - it will bend much easier that way.) Cut it and attach it to the deck frame, ridge and gunwales.
26. Wipe off extra glue and wait for it to harden. Perhaps overnight.
27. Make mast partner (board where mast is supported at deck level) and attach it.
28. Make mast step (where bottom of mast sits on the bottom of the boat) and attach it.
Take a good look at what you have done.
Sand it as needed.
Paint it with at least 2 coats of paint. Minimum type of paint is what we call
deck and porch enamel. You could use epoxy paint.
Lightly sand between coats of paint.
The Hull is esentially finished.
----
More detail on construction will follow. This done late 1 July 2000.
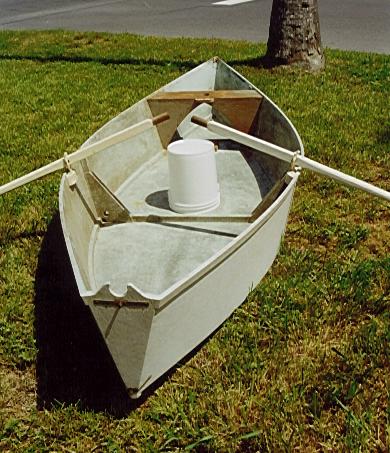
The sides are made from 16 inch pieces cut from a sheet of plywood,
attached at the ends and spread by the middle frame.
This boat does not have a Thwart (seat) to spread the sides.
In that it is exceptional. The user may sit on the bottom, on a
flotation cushion, or a plastic 5 gallon bucket turned upside down.
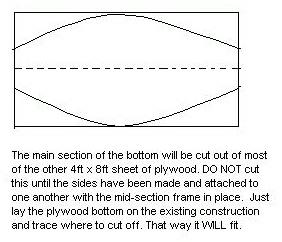
How the cuts should go on the 3rd 16 inch wide strip.
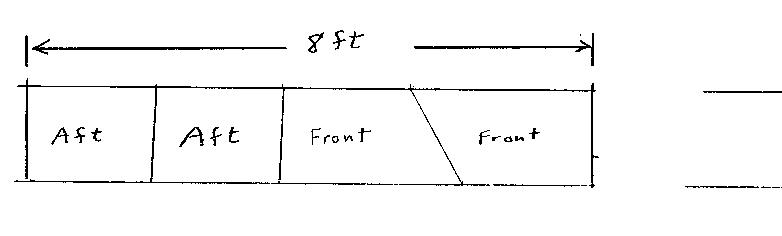
The bottom will be cut out of the other piece.
Contrary to the image below do not try to center it.
Use it so as to take full advantage of the wood available,
remembering that the front and back little triangular bottom pieces will have to come out of this piece.
-
Click here to the whole hull pictures (dhboatP1.htm).
Click here to the Hull Detail pictures (dhboatP2.htm).
Click here to the Detail pictures - Leeboard - (dhboatp3.htm).
Click here to the Detail pictures - Rudder - (dhboatP4.htm).
Click here to the Detail pictures - Oars - (dhboatP5.htm).
-
Click here to return to the boat building page.
If you mail me about this page refer to page dhboat1.htm